
Common subjects for macro photography
Common Close-up Subjects
In the second instalment of this mini-series we looked at the technical challenges we face when we start to magnify our subjects heavily, but what makes a good macro subject to start with? The simple answer is that anything can be photographed up close, just as most things can be photographed from a distance. However, there is a trio of macro subjects that definitely have the greatest appeal, so let’s take a look at what they are and how we can make the most of them.
Post author: Chris Gatcum
FREE ONLINE BEGINNER’S PHOTOGRAPHY COURSE
A Year With My Camera is free by email and will get you off auto mode in less than 6 weeks. Join here and get started today:

Insects
From multi-eyed spider portraits to the beautiful iridescence of a dragonfly’s wings, macro photography has the power to transport us into the hidden world of insects and bugs, revealing details that we might otherwise never see.
Exploring this world is far from easy, though, and by far the biggest challenge you face is dealing with a living, moving subject – you can’t ask a bee to sit ‘just so’ while you fiddle with your exposure settings. This means you need to be ready from the outset, with your white balance set and your exposure dialled in. As you’re dealing with potentially mobile subjects, your choice of shutter speed is important, and faster speeds are usually preferable here. At the same time, you need to ensure you have sufficient depth of field, which typically means stopping down the aperture (depending on your subject, f/11 could be as wide as you would want to go).
An effective way of working here is to use your camera in Manual mode, with the ISO set to Auto. This way you can choose the shutter speed and aperture you want (1/60 sec. and f/8 is a good all-round start point) and the camera will set the ISO. However, if there’s not a lot of light around, this might mean you end up shooting at an ultra-high ISO, resulting in noisy images. For this reason, a lot of insect specialists use macro flash units, which allows them to use a fast shutter speed, small aperture and a low ISO – the ideal combination.

A ring flash will give you a fast shutter speed that lets you hand-hold your camera. This is useful for reacting quickly to your subject and freezing any movement, but you need to focus carefully, as the slightest shift in the focus distance can blur your subject significantly.
Achieving your ideal exposure is only part of the battle, though, as you will quickly find that focusing is also far from easy when you’re dealing with a moving subject. Although it might sound counter-intuitive, focusing manually can be more effective than autofocus. However, instead of turning the focusing ring to focus on your subject, pre-focus your lens at a distance that gives you the magnification you are after and then physically move your camera backwards and forwards to snap your subject into focus. For example, if you set your focus at 45cm, you simply need to get yourself that distance from your subject. This method works best if you’re hand-holding your camera, in which case you will also want to activate any lens- or camera-based stabilisation to help prevent camera shake.
Alternatively, you can set up your camera on a tripod, pre-focus on a particular flower or leaf, and play a waiting game. This can work well with bees and other insects collecting pollen, ants following a particular path, or any other subject that tends to frequent a specific spot – you simply need to set up your camera and wait for them to step into the frame.

Some insects follow a predictable path, allowing you to set up your camera, pre-focus on a particular point and wait for them to move into position.
As well as essential camera skills, carefully selecting the time when you take your outdoor insect shots can also help. For example, many insects are less active at the start of the day, before the sun warms them. So, if you head out at dawn to look for dozy dragonflies you will find they are far easier to photograph than they are when they’re flitting about during the day. The same goes for other insects as well.

Like dragonflies, butterflies are best photographed at the start of the day, when it is cooler and they are less active. A slightly overcast sky will soften the light and prevent hard shadows being cast.
However, while they may be more amenable to being photographed, under no circumstance should you be tempted to try and move your subject. Yes, there might be a ‘better’ setting for your photograph, but any interference should be avoided. There are some photographers who think nothing of intentionally freezing or killing their potential subjects so they can pose them for the ‘best’ shot. Everyone is entitled to their own opinion on this, but ask yourself this: would you kill a larger animal just so you could photograph it? The majority of insects may be small, but this doesn’t make them any less significant than larger living wildlife subjects.
Flowers
Whether it’s the fine veins running through their petals, the tiny hairs on their stems or individual grains of pollen, the closer you look at flowers the more detail is revealed. This makes them a fantastic close-up or macro subject to explore with your camera, indoors or out.
There’s a lot to be said for photographing flowers indoors. For a start, you don’t have to worry about your subject moving in the breeze (although you should take care to avoid drafts) and you can also take full control over the lighting. The simplest option here is to position your chosen flower(s) by a window on an overcast day. This will give you a large, soft light source that will avoid hard shadows, but still provide a bit of directionality to the light; off-cuts of white or silver card make great reflectors in this situation.

Soft light is often best suited to close-up and macro flower photography, as it prevents hard shadows; a reflector can also prove beneficial.
This is also the perfect situation to start exploring flash photography, perhaps substituting the light from the window with the light from a flash, with a reflector or additional flash to fill in the shadows. The advantage of using flash is that you will be able to work with faster shutter speeds, reducing the risk of blur-inducing camera or subject movement, while maintaining a relatively small aperture (just remember not to go too small, or diffraction might soften your images).

Photographing flowers indoors lets you experiment with your lighting – this macro set up sees a small light tent augmented by two flash units.

Don’t just take ‘obvious’ close-up photographs. You can combine your macro work with other techniques – the delicately translucent petals of this flower were photographed using multiple exposures.
Using flash is also worth thinking about if you choose to photograph wild flowers growing outdoors, as you can again benefit from motion freezing shutter speeds. Think about how you might soften the light from the flash, though, as aimed directly at your subject it may be too ‘hard’ and create dark shadows; aiming it through some sort of diffuser (a sheet of greaseproof paper, for example) is one option, or you might aim the flash away from your subject and bounce the light back off a piece of white card. A reflector positioned on the opposite side of your subject to the flash will quickly fill in any hard shadows.
If you prefer to work with natural light, an overcast day provides the soft, enveloping light that is usually most sympathetic to flower photography, but a diffuser of some description can also be used if it’s sunny. However, you need to be aware of any slight breeze that might create motion blur and be prepared to shield your subject; slight movement is the Number One cause of blurred flower photographs taken outdoors.

The seeds of a dandelion – the dandelion ‘clock’ – can make a great macro photograph, but watch out for any breeze that might destroy your subject.
If there’s not too much wind, something as simple as a reflector might be all you need, with the added bonus that it lets you fill in the shadows at the same time – just make sure the reflector is held securely so it doesn’t topple on to your subject.
In slightly windier conditions a light tent provides a more comprehensive shelter. Light tents are typically made from some sort of diffusion material attached to a lightweight, portable frame. There are plenty of commercial light tents available, although most of these are designed for studio use and have a fixed ‘floor’. Don’t let this put you off, though, as it is often easy enough to use scissors or a craft knife to create a ‘bottomless’ tent that you can place over your floral subjects. Alternatively, look for a light tent that has a top opening as well as a front one, and simply flip it upside down. In either case, be sure to weigh the tent down so it doesn’t blow away.
Yet while a light tent is a great way of shielding your subject, there is one major downside to this approach: you will typically be stuck with the white interior of the tent as your background, unless you introduce a piece of coloured card (or similar), or take your tent modifications a step further and replace the white back ‘wall’ with something transparent. However, if you get to that stage you might want to start thinking about constructing your own bespoke tent instead.
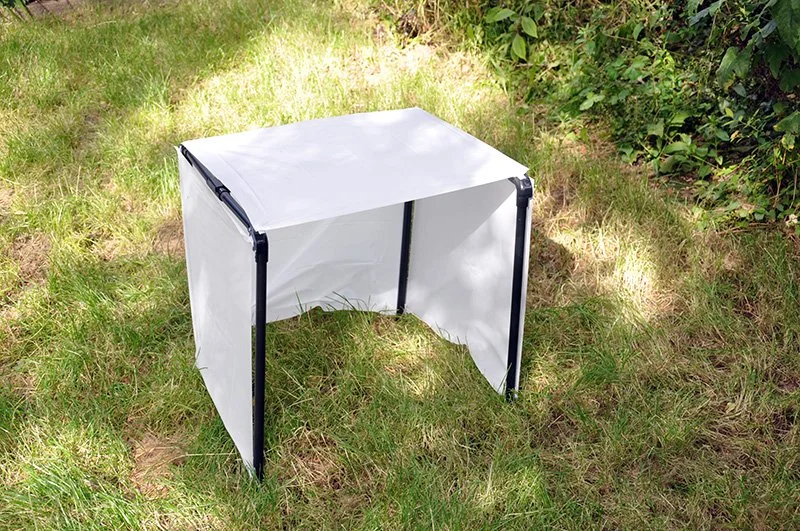
This homemade light tent was constructed from plastic conduit (tubing) and a shower curtain. As each side is removable, the diffusion can be modified and the back can be taken off to give a natural background.
Abstract
Macro photography and abstract images make perfect bedfellows. Not only does everything become naturally more abstract when you start to see it from a much-closer-than-usual viewpoint, but even seemingly banal subjects can be transformed into abstract works of art – peeling paint, a tiny section of fabric and rusting metal all have fantastic abstract potential.

Rusting metal might not sound like ‘photographic gold’, but frame your macro and close-up shots carefully and you can find beautiful abstract images in the most unassuming places.
The key here is to forget what the object is that’s in front of your camera and instead concentrate on the shapes and colours (or tones) in the frame. This is a great opportunity to really hone your composition skills, so look out for dynamic diagonal lines, calming horizontals and energetic verticals, and use these to control the energy in your abstract image. Think about how the colours in the frame work with one another and keep an eye out for complementary and harmonious colour schemes – perhaps you can create a series of abstract photographs based on a common colour?

How you frame your macro subjects is just as important as the way you choose to frame any other subject. The off-centre framing of this Echinacea flower creates a more interesting abstract image than a central subject would.
Other compositional ‘rules’ can be just as important, so brush up on the rule of thirds, golden ratio and so on, and think about how you can use them to give your abstract shots a formal structure. Don’t be afraid to break from convention, though –after all, these are guidelines, not ‘laws’ that need to be obeyed in each and every shot you take.
One of the great advantages of abstract macro photography is that your source material can be relatively flat or two-dimensional, such as peeling paint, for example. This can help you avoid potential depth of field issues, as you only need to get a single plane in focus, but it still pays to set up your camera carefully on a tripod so you can align it precisely – there’s nothing worse than finding your abstract image slowly drifts out of focus at the edges of the frame because your subject wasn’t quite square to the camera.

The colourful detail of a peacock feather makes for a bold abstract image.
Abstract images can also be relatively easy to light, as you often won’t want or need anything more than flat, even illumination. Photographing in shade or on an overcast day is one way of achieving this, or you might consider using a ring light – just watch out for bright reflections on glossy or shiny subjects.
WHAT IS A YEAR WITH MY CAMERA?
Emma Davies wrote A Year With My Camera to help you be completely confident with your camera controls so you can start enjoying your photography and having fun once again. It’s available free by email (join below) or in an app (search on your app store) or in bestselling printed workbooks available on your local Amazon store.