
What is "noise" in photography
At some point on our photographic journey most of us will encounter a coarse, ‘gritty’ texture across our shots. This is what’s known as ‘digital noise’, ‘electronic noise’ or simply, ‘noise’, but what is it and where does it come from? Why does it appear in some images, but not others, and – more importantly – what steps can we take to alleviate it?
Post author: Chris Gatcum

Free back-to-basic photography course
Emma’s flagship beginner’s course, A Year With My Camera, is free by email (there is a small charge to join the optional app community). Join here and get started today:

Types of photographic noise
There are two types of noise that you might encounter, both of which are caused by the electronic processes that underpin the creation of a digital photograph. To a certain extent this makes noise an inescapable by-product of digital capture.
Luminosity noise: Luminosity noise is a colourless ‘grainy’ texture underlying an image, but despite its appearance it shouldn’t be confused with film grain, which is a very different thing. Luminosity noise tends to have a fine texture and can be apparent in both the light and dark areas of an image – and everything in between.


This floral still life was photographed with a full-frame camera at ISO 6400. The high ISO setting has introduced ‘grainy’ luminosity noise, but it doesn’t detract from the dark image.
Chromatic noise: Chromatic (‘colour’) noise appears as unwanted colour artefacts in an image. Typically red, green and blue in colour (the primary colours that make up a digital photograph), these artefacts can range from small speckles to larger patches of colour, depending on the camera. Chromatic noise is most prevalent in mid-to-dark tones.
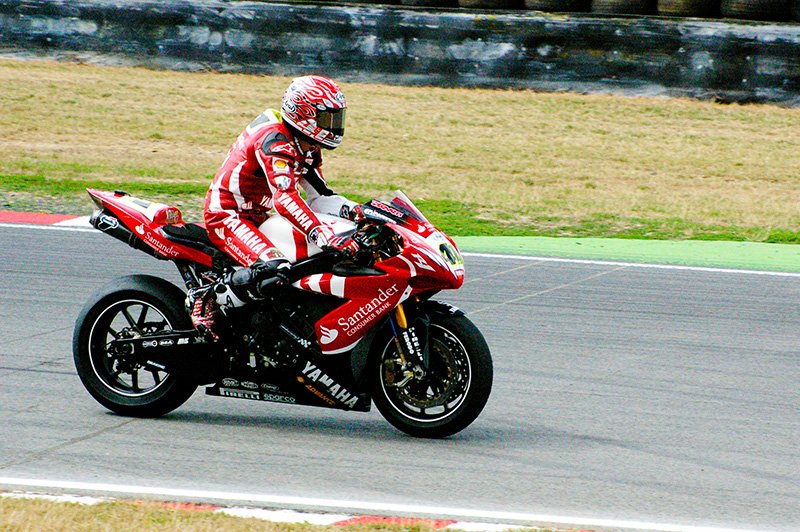

Taken with the ISO set at 3200 on an old APS-C format digital SLR, chromatic noise plagues this image – the racing track is grey tarmac, but up close you can see patches of red, green and blue (especially in the shadow under the wheel).
How often you experience each of these types of noise depends largely on how – and what – you photograph, but in each case they will be exaggerated if you lighten an image during post-processing. This has the potential to turn a smooth black area into a textured mosaic, which is a good reason why you should aim to get your exposures correct at the time of shooting, and why some photographers use the specialist shooting technique of ‘exposing to the right’ (ETTR) in an attempt to minimise image noise even further. But what causes noise to start with?
Amplification
The most common cause of noise is shooting at a high ISO setting. This is because when you raise the ISO, your camera increases the amplification of the image-forming signal (the light hitting the sensor that’s been converted into an electronic signal). However, while this effectively makes your sensor behave as if it is more sensitive to light, enabling you to shoot in low-light conditions, the amplification also applies to any non-image-forming signal elements.
This is analogous to turning up the volume on a record player: not only will you amplify the music (the ‘signal’), but any background pops and crackles (the ‘noise’) will become more obvious as well. In digital photography, this background noise presents itself as luminosity and/or chromatic noise, both of which get worse as the ISO increases.
The point at which high ISO noise becomes ‘unacceptable’ depends in no small part on the camera you are using. Older cameras tend to be noisier than modern ones, and cameras with smaller sensors tend to be noisier than those with larger sensors, so you may find that noise is only an issue at the very highest ISO settings (ISO 6400+) on a modern full-frame camera, but could be apparent at ISO 400 on an older camera with an APS-C or Micro Four Thirds sensor.

Early digital cameras – especially those with small sensors – suffered quite severely from noise, which limited their capabilities. Today, however, you will find higher ISO settings are perfectly usable, with many modern full frame cameras delivering images at ISO 800 that are almost indistinguishable to those taken at ISO 100.
The camera and its sensor size are not the sole determining factors, though. The size at which an image is viewed will also play a part, as enlarging an image will make any noise more apparent. There is also a certain amount of subjectivity involved, as what you consider to be ‘too much noise’ might be entirely acceptable to someone else. We shouldn’t forget the importance of what’s being photographed, either; a noisy image of a once-in-a-lifetime moment is infinitely preferable to no record of that moment at all.
With so many factors involved it is well worth running a test with your particular camera. Set it up on a tripod (ideally) and take a series of photographs of a subject containing a range of tones and areas of fine detail. Work your way from your camera’s minimum to maximum ISO and view your images at the size you would normally expect to present them at. The ISO setting before noise becomes unacceptable (in your opinion) can be considered your maximum working ISO, unless going higher is unavoidable.
Long exposure noise
Long exposures are the next biggest cause of noisy images. Specifically, it is the heat generated on the sensor during a long exposure that creates erroneous signals, which is why serious astro-photographers use specially cooled imaging chips to record ultra-long-exposure images of the cosmos through their telescopes.
However, you don’t necessarily need specialist equipment to turn your lens skyward and photograph the night sky. Rather than making a single (noisy) long exposure to record star trails, you can make multiple shorter (less noisy) exposures that can be combined during post-processing. The overall result will be the same, with stars trailing across the night sky, but the level of noise will be reduced dramatically.

Creating star trail photographs at night might suggest you need to use an ultra-long exposure, but you can minimise the amount of noise generated by making multiple shorter exposure and ‘stacking’ the images.
There are, of course, other scenarios where a long exposure is necessary – because the ambient light levels are low, for example, or you’ve fitted a dark neutral density filter to use long exposures creatively. In these situations you may need to start thinking about making compromises with your other exposure settings. Can you perhaps use a slightly wider aperture to benefit from a correspondingly faster shutter speed, or maybe increasing the ISO by a stop or two would result in a less noisy image than a long exposure?
In-camera noise reduction
If you can’t (or won’t) compromises on your exposure settings, another option is to turn to camera- or software-based noise reduction. Since the early days of digital photography, in-camera noise reduction (often abbreviated to NR on your camera’s menu) has been on hand to help combat the effects of noise.
Many cameras now have more than one noise reduction option, so you can choose to target either high ISO or long exposure noise, or both. Of the two, high ISO noise is the hardest to tackle, as it is random in nature. This means the camera has to try and differentiate between noise and fine detail, and although the algorithms behind this are improving all the time, you may find that detail is lost in your images, especially when a high amount of noise reduction is applied.
By comparison, long exposure noise is consistent, so given the exact same exposure time, the exact same amount of noise will be generated. This makes it far easier to tackle using a process known as ‘dark frame subtraction’. This process works by making a regular exposure to record the image, which is followed immediately by a second exposure of the same duration, but without the shutter opening. As the shutter doesn’t open, the secondary ‘dark frame’ should be pure black; any non-black pixels are therefore noise, which the camera can target in the main image.
Although dark frame subtraction is an effective way of reducing noise in long exposure images, it does have one potentially major drawback: for every exposure you make, your camera has to make a second exposure of equal duration, during which time you will be ‘locked out’ of your camera. This might not be a problem if your exposures are lasting a few seconds, but it can quickly become counter-productive with exposure times of several minutes or more.
In-camera noise reduction is best employed when you are shooting JPEGs and don’t intend to process your images.
Post-processing noise reduction
The alternative to in-camera noise reduction is to tackle noise when you process your images. This is definitely the path to take if you shoot Raw, and is also the best approach when it comes to high ISO noise. Not only can noise be reduced with greater refinement in most image-editing programs, when compared to in-camera noise reduction, but there are dedicated apps that use camera-specific profiles and sophisticated algorithms to help you achieve the best results.


Photoshop’s noise reduction (found in the Filters menu) enables you to precisely control the balance between noise reduction and detail retention, as well as allowing you to target the noise in individual colour channels.
Post-processing also lets you apply your noise reduction selectively, so you can target certain parts of an image while masking others. For example, in a landscape image you might choose to apply quite aggressive noise reduction to the sky, as this is typically a rather detail-free area that will reveal noise quite readily, but at the same time apply little or no noise reduction to areas containing fine detail, such as foliage and grass.
However, no matter which type of noise you are targeting, or whether you’re tackling it in-camera or during post-processing, the key thing to remember is that the process is noise reduction. No matter how sophisticated your software is, attempting to remove all of the noise from a noisy image will inevitably remove fine detail as well. For this reason, noise prevention is often preferable to noise reduction.
Join A Year With My Camera by email: