
Beginner's studio flash
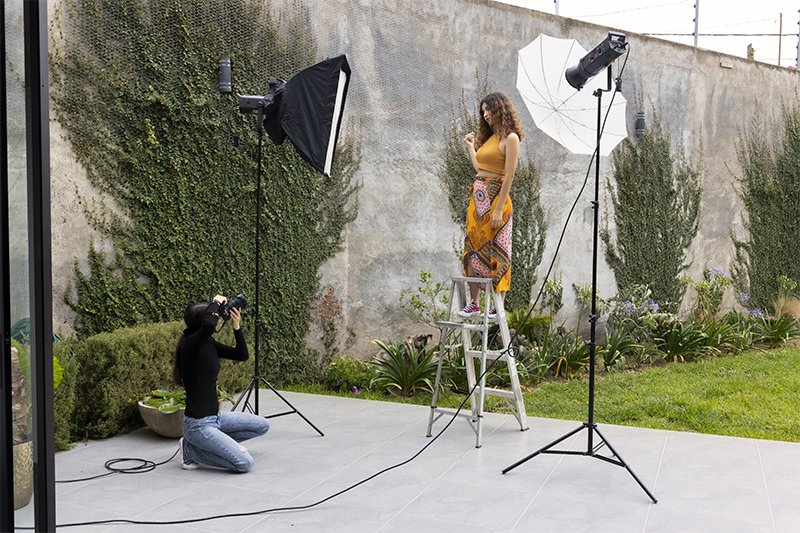
In the final part of this mini-series on using flash we’re going to explore studio flash units, which are also known as ‘strobes’. This type of flash falls into two categories: monoblocs and ‘packs and heads’. The main difference between the two is that monoblocs have all of the flash controls in the flash unit itself, whereas pack and head systems utilise a separate power pack that contains the controls and you plug one or more flash ‘heads’ into that. Of the two, monoblocs are by far the most popular option for home and high street studios, and the main focus here.
Post author: Chris Gatcum
FREE ONLINE BEGINNER’S PHOTOGRAPHY COURSE
A Year With My Camera is free by email and will get you off auto mode in less than 6 weeks. Join here and get started today:

Anatomy of a studio strobe

As with cameras, monoblocs vary from manufacturer to manufacturer, but most share the same basic features, which typically include:
A dial to control the flash power.
A test button to manually trigger the flash (to take exposure readings, for example).
A modelling light (a low power continuous bulb that gives an indication of where the light from the flash will fall).
An optical secondary cell (previously called the ‘slave’ cell) that will fire the flash when it detects another flash firing.
A sync socket that allows you to attach a sync lead between the flash and camera.
An optional audible signal that ‘beeps’ when the flash is fully charged, so you know when it’s ready to fire again.
Big benefits
Although you can get some high-power hotshoe flashes, even the most rudimentary studio strobe is likely to produce a lot more light (and will probably cost a lot less as well). This means you can illuminate a larger area while simultaneously using smaller apertures and lower ISO settings than you would have to use with a hotshoe flash. The power of studio strobes is measured in watt/seconds or joules, rather than guide numbers, and the bigger the number the more powerful the flash. For a home studio, a 400w/s flash should prove more than powerful enough, although both higher- and lower-powered strobes are available.
It is not just their increased power that makes studio strobes so versatile, but also the light modifiers you can attach to them to control the light from the flash. The precise range of accessories you can use will depend on the flash system you choose, with established ‘pro’ brands tending to offer a wider range of modifiers than low-cost ‘amateur’ flash heads. The most common accessories are:
Reflector dishes: Reflector dishes control the spread of light. They range in size and shape from ‘spill-kills’, which are shallow dishes designed to prevent the light from ‘spilling’ out to the side or behind the flash, to deeper and narrower ‘tulip dishes’ that create a narrower beam of light. Between these extremes lies a range of different sized reflectors.
Umbrellas: Umbrellas are a staple in portrait studios. With a reflective umbrella, the flash is aimed away from the subject into the umbrella, which bounces the light back on to your subject. In doing so, the light is softened. Reflective umbrellas typically come in three colours: white (standard), silver (for a slightly ‘harder’ light) and gold (for warmer light). You can also get shoot-through umbrellas, where the flash is aimed at your subject and is diffused as it passes through the umbrella’s semi-translucent cover.
Softboxes: Like shoot-through umbrellas, a softbox has a semi-translucent diffuser on the front of it, through which the flash is fired. Many softboxes have a second, removable diffuser inside them for extra diffusion. Softboxes come in an array of shapes, including square, rectangular and octagonal, with the latter creating a natural-looking, near-circular catchlight in portrait subjects’ eyes. Each type is available in different sizes, with larger softboxes producing softer light.
Snoot: This conical accessory creates an ultra-narrow beam of light that lets you can concentrate your flash on a specific part of a scene. Grid attachments can often be used on the front of a snoot to concentrate the light pool even more.

Reflector dishes, umbrellas and softboxes are the backbone of most studio lighting setups

A snoot can be used to create a narrow pool of light that is perfect for throwing a ‘spotlight’ on your subject.
However, while a wide range of light modifiers and the power of a studio flash can make it more versatile than a hotshoe flash, it is not without its downsides. For a start, the majority of studio strobes are fully manual. There are a few TTL models available, but these are few and far between, and tend to be considerably more expensive than their ‘basic’ counterparts. Similarly, while you can buy battery powered studio flashes (again, at a premium price), most require mains power, so you’re generally limited to shooting indoors, or within reach of a power supply. Consequently, if you need TTL control and portability, a hotshoe flash might be more suitable.
It’s possible to use studio strobes outdoors, but you will need to be within reach of a power socket (or generator), or consider investing in battery powered flashes instead.
Control and connection
In most ways, using a manual studio strobe is no different to using a hotshoe flash in manual mode: you will need to dial in the power of the flash, and set the appropriate aperture and ISO on your camera. Unless you are balancing the flash with any continuous ambient lighting the shutter speed is of secondary importance, and simply needs to be set at the camera’s sync speed or slower.
However, one key difference between hotshoe and studio flashes is that studio strobes don’t use guide numbers. Therefore, the only way of determining the exposure – short of relying on trial and error – is to use a handheld flashmeter to take either reflected or incident light readings from your subject. This is far easier than it sounds, and generally involves little more than holding the flashmeter in front of your subject, aimed back towards the camera; when the flash fires the flashmeter will read the light and tell you what aperture you should use at a given ISO.

A flashmeter takes the guesswork out of your exposures
Of course, you also need a way of triggering your studio flash(es). Most monoblocs feature an optical secondary sensor that will trigger the flash when it detects another flash firing. This not only allows you to use multiple flashes in a setup, but also means you can use your camera’s built-in flash as a trigger.
You can also connect a monobloc using a sync lead plugged into a PC sync socket on your camera or a hotshoe-mounted PC socket adapter (in a multi-flash setup you would typically connect the camera to one flash unit and the secondaries would trigger the rest).
Alternatively, there are now plenty of low-cost wireless triggering systems that consist of a transmitter that slides into the camera’s hotshoe and a receiver that attaches to one of your studio flashes, effectively replacing the traditional sync lead. Although a wireless trigger is an additional expense, it can be a beneficial one, as you don’t have to worry about getting tangled in sync leads and potentially pulling a flash over in the process.

A wireless flash triggering system is a great way of keeping your studio free from trailing sync leads that could trip you up.
Starting out
Most studio strobes can be bought as a kit, consisting of three flash heads, lighting stands, sync leads and a couple of reflectors and umbrellas to give you a modicum of control over the light. A basic setup like this a great way of getting into studio flash, but it’s also a great way of confusing yourself when you’re starting out.
Your studio strobe kit might contain two or three flashes, but you can achieve a lot with a single light and a reflector
Although you may have several flashes in your kit, consider using just one of them initially. This will let you familiarise yourself with your flash’s controls, experiment with the direction of the light, and explore how a reflector or umbrella can affect the quality of the light. If hard shadows are a problem, simply use a large sheet of white card on the opposite side of your subject to your flash to bounce the light back and ‘fill in’ the shadows; reflectors are incredibly useful tools in the studio.
When you’re comfortable working with a single flash, substitute your reflector for a second flash. This will generally serve as a weaker ‘fill’ light, while your main light is the ‘key’ light. The biggest difference between using a reflector and a flash as a fill light is that you can control the power of the flash to change the lighting ration (the difference in intensity between your key and fill lights). You can also make the light from the flash softer or harder through your choice of accessories, and have greater flexibility over where you position it.
If you have three (or more) studio strobes you can start to explore even more complex lighting setups as your skills develop, perhaps adding a hair light to your portraits, or a spotlight to your studio shots. It’s impossible to cover all the options here, but there are plenty of books, websites and online tutorials dedicated to studio lighting, so you are sure to find something that relates to your preferred subject. Don’t forget that trial and error, and experimentation are equally important parts of the learning process, though – don’t be afraid to explore your own setups as well.

The more lights you have, the more inventive your lighting can become.
Inverse square law
You don’t need to understand the physics underpinning the rather grand-sounding ‘inverse square law’ to use studio flash, but a passing knowledge of the basic concept can prove useful. Essentially, the inverse square law states that if you double the distance between your flash and your subject, your subject will receive ¼ the amount of light (not ½ as you might expect), which equates to a 2-stop loss in exposure terms.
For example, if your flash is 1m away from your subject and you move it to a distance of 2m you will need to increase the exposure by 2 stops. If you then moved the flash to a distance of 4m the illumination would drop by ¼ again and you’d lose another 2 stops. This rule applies regardless of the distances involved, so moving a flash from 100m to 200m would still only be a 2-stop difference.
WHAT IS A YEAR WITH MY CAMERA?
Emma wrote A Year With My Camera to help you be completely confident with your camera controls so you can start enjoying your photography and having fun once again. It’s available free by email (join below) or in an app (search on your app store) or in bestselling printed workbooks available on your local Amazon store.