How to get started with wildlife photography
You don’t need a 600mm lens and a safari to enjoy wildlife photography; get to know your subject, and start small.
Know your subject
The skill in wildlife photography is understanding your subject. Where and when will they be visible? What will their behaviour be? The better you know your subject the easier it will be to predict where they will be and therefore where you should stand.
If you are just starting out, be humble and patient. You are unlikely to just pitch up at an RSBP reserve and get an award-winning shot of a diving kingfisher. Educate yourself on one animal at a time.
Start small
Practice in your back yard before you take your gear out into the wild. Insects and small birds make great subjects and will help you understand the exposure and focus skills you will need as you venture further afield. Remember the insect needs to take up a lot of the frame, not be a speck in the distance. If you have a macro lens this can help you get closer.

These were all shot with a 100mm macro lens, f2.8, ISO100 and shutter speeds of 1/500th-1/1250th.
The size of the animal in the frame is the first thing that beginners get wrong. You can have a photo of an eagle overhead (see below, one I took the first time I saw a sea eagle) that you were delighted to see but which takes up less than 5% of the frame. This is a snapshot not a wildlife photograph. The animal needs to fill the frame more, and to do this you either need to be very close or have a long lens (the second shot was taken from a car by the side of the road on a 200mm equivalent).

The three elements you need
For any good photograph you need the exposure to be correct, some appealing light and a good composition. Because the life you are photographing is wild, you can’t control where it will be at any moment (although see below in the Ethics section for a discussion on baiting). This is what makes wildlife photography so challenging and so rewarding when it all comes together. Work on each element in turn:
Exposure: you need to know how to get a shot that is neither under nor over exposed. You need to know which shutter speed to use and how the aperture and ISO will affect your final shot (join my free beginner’s workshop at the end of this post if you need help with this).
Light: you can’t move the sun. So you have to move yourself to position the light in a way that creates the shot you want.
Composition: not only do you have to continually adjust your focus as the animal moves but you have to keep half and eye on the background and foreground to make sure they are A) not distracting and B) arranged in a way to make an appealing final shot.

Settings and tips
The longer the lens the more camera shake you will get. Use at least the inverse of the focal length: for a 300mm lens use at least 1/300th second. Use vibration reduction if you have it (unless you’re using a tripod).
Animals tend to avoid coming out at midday when the light is best. You will be shooting in low light. Don’t use a flash; it will disturb the animal (macro shots of insects may be an exception). You will already be using a fast shutter speed so you’ll need to use a wide aperture and/or a high ISO to get enough light onto the sensor. If you’re using a wide aperture check your focus very carefully.
The rule of thumb is that the animal’s eye that is closest to the camera must be sharply in focus.
If you are entering a competition judges usually like to see the animal engaging in some kind of behaviour rather than a straight portrait. They also like to see a catch-light in the eye which is usually a reflection of the sun or something bright. Some photographers use fill-flash to create a catch-light but please research your subject in advance to know whether this would cause distress.
Macro lenses show magnify everything including camera shake. Double whatever shutter speed you thought you would need if hand-holding.
Once you are comfortable getting the basic exposure and focus correct and can shoot a pin-sharp photo of your subject, try slowing the shutter speed to introduce a bit of movement.
Research teleconverters if wildlife photography becomes a passion. These little tubes will convert a long lens to an even longer one (eg. a 1.4x converter turns a 300mm into a 420mm). But you lose your wider aperture settings as well, so it’s not the perfect solution.
Practice new techniques such as slower shutter speeds close to home. Review your settings. Make notes of what works and what doesn’t so that when you see that rarer species you will know what settings to use without missing the shot:
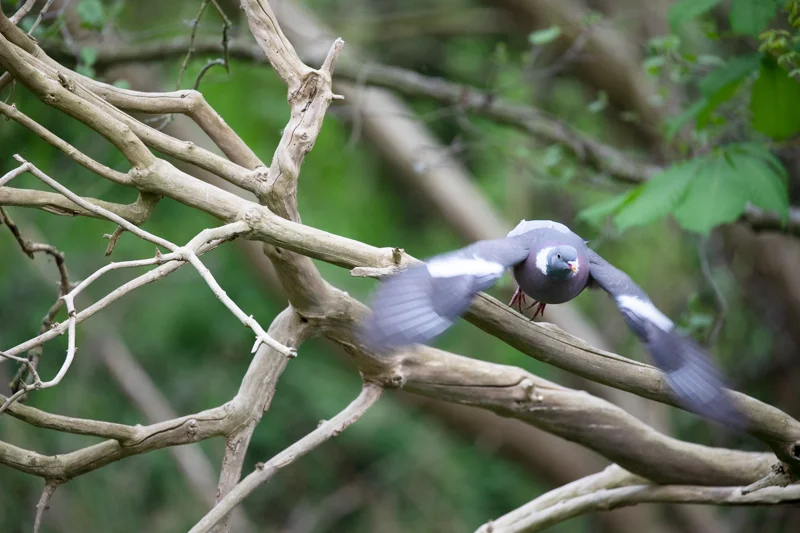
Pigeons for practice. This is a 1/400th shutter speed and shows probably too much movement in the wing.
Ethics of wildlife photography
The best wildlife photographers respect the animal they have come to see. The animal shouldn’t even know you are there. However, many photographers will leave bait or create artificial environments to get their shot and you will see many dubious practices in the wildlife photography space. Remember that just because others do unethical things doesn’t mean you need to lower your standards.
Feeding
At one end it is utterly unethical (and dangerous) to feed wild animals an inappropriate diet. You upset their digestion and encourage them to become reliant on humans. When they don’t get the food they want they can attack.

I took the shot on the left from the side of the road and then later saw tourists feeding deer from a car park in Glen Coe. Read these links to understand why this is wrong: Deer becoming too tame and deer becoming dangerous.
On the other hand leaving appropriate food for garden birds is a life-saver to many smaller species:

Artificial environments
If you see a shot of a kingfisher with a perfect splash or a harvest mouse perfectly posed on a stem of wheat how can you be sure the photographer didn’t stage the shot? You usually can’t tell. Search for “Kingfisher photography in tanks” to find out how photographers can stage a shot “naturally”. And if you investigate harvest mice workshops you will find plenty of opportunities to photograph these creatures in a studio setting.
Wild animals as pets or kept in zoos is a discussion for another day. As far as the ethics of wildlife photography goes the main issue arises if you want to enter a competition. Read the rules very carefully if you want to enter a shot of anything baited or staged.
Crossing the line
If you start to follow amateur wildlife photographers online you might see some images you want to emulate. I cannot condone either of the following common activities in this community: photographing nesting birds and freezing insects for macro shots. If you disturb a nest you do risk the parents deserting it. If you take a shot from an appropriate distance please share that information in your caption so others know it’s something to think about.
If you are new to macro photography you probably didn’t realise that many of those extreme close-up shots you see of insects’ eyes are either of a dead insect or one that has been chilled to make it stop moving. This can make it frustrating for a beginner as they try to replicate a shot they’ve seen, not realising the lengths that the unethical photographer has gone to in order to keep the animal motionless.

Free beginner’s workshop
Do you need help with the basics? My free online beginner’s course will get you off auto in the first six weeks. Join here and get started today: